![15 Easy Science Project Ideas Your Kids Can Do Today [Using Kitchen Items] - Junibear](http://www.junibear.com/cdn/shop/articles/15_Easy_Science_Project_Ideas_Your_Kids_Can_Do_Today_Using_Kitchen_Items_44913d5d-bb4a-45a0-8d45-0f5498667d74-6556934.webp?v=1754460710&width=1100)
15 Easy Science Project Ideas Your Kids Can Do Today [Using Kitchen Items]
Your kitchen holds countless science project ideas perfect for those rainy afternoons when kids bounce off the walls.
Parents know the challenge of finding activities that entertain children while teaching them something valuable. STEM (science, technology, engineering, and math) experiments give kids a practical way to understand how the world works. These hands-on projects help children develop engineering skills and creativity while they explore physics. The best part? You don't need expensive equipment or complex setups.
Most cool projects need just regular household items, though some experiments might require special materials. Simple experiments might look basic at first glance, but they push children to think critically and find creative solutions. A completed challenge boosts kids' confidence and gives them a real sense of accomplishment.
We've gathered 15 simple science experiments you can try at home using common items from most Indian households' kitchens. Your little ones will love these visually rich, hands-on activities that teach simple science concepts and keep them excited about learning through sensory experiences.
Make a Rubber Egg with Vinegar

Image Source: YouTube
Let's create bouncy eggs with an amazing kitchen science experiment! The rubber egg project stands out as one of the most eye-catching yet simple science activities you can do at home.
Rubber Egg Materials
- 1 raw egg (white-shelled eggs work best)
- White vinegar (enough to submerge the egg)
- Clear glass jar or container
- Optional: Food coloring
- Bowl of water to rinse
Steps to Make a Rubber Egg
- Place the raw egg in your clear container gently.
- Add enough vinegar until it covers the egg completely.
- Watch tiny bubbles form on the eggshell right away—the reaction starts now!
- Keep the egg submerged for 48-72 hours. You'll get better results if you change the vinegar after 24 hours.
- Remove the egg and rinse it under running water after 2-3 days.
- Rub away any remaining shell residue—it should come off without much effort.
- Look at your egg against light and you'll see the yolk inside the clear membrane.
- Check how bouncy it is by dropping it from 10-15 cm above a surface.
Science Behind the Rubber Egg
The transformation happens through a chemical reaction between vinegar and eggshell. Vinegar has acetic acid (about 5% concentration) that reacts with calcium carbonate, which makes up 95% of the eggshell. This creates carbon dioxide gas (those bubbles you see!) and dissolves the hard shell.
The egg's semi-permeable membrane remains intact and stays strong because it contains keratin—the same protein that's in human hair. Water from the vinegar moves through this membrane by osmosis, which makes the egg swell a bit.
Best Age Group
Kids between 5-10 years love this experiment. The younger ones (5-7) get excited watching the bubbles and the transformed egg. Older kids (8-10) grasp the chemical reaction concepts better and learn about semi-permeable membranes.
Indian families will find this experiment easy to set up since vinegar is a common kitchen ingredient. This educational weekend project lets children track daily changes and makes chemistry fun to learn.
Create a Balloon Car

Image Source: YouTube
Let's combine chemistry and physics to create an exciting balloon-powered car that races across the floor! This fun project helps kids learn basic concepts of motion and energy using simple items from your kitchen.
Balloon Car Materials
- A plastic bottle, small cardboard box, or index card for the car body
- 4 plastic bottle caps for wheels
- 2 wooden skewers (you'll find these in Indian kitchens for making kebabs)
- 2-4 drinking straws
- 1 balloon (regular party balloon)
- Tape (masking or duct tape works best)
- Scissors
Steps to Build a Balloon Car
- Cut two straws that match your car body's width. These should be a bit shorter than the bottle's width if you're using one.
- Place these straws parallel on opposite sides of your car body and tape them down. They'll hold your axles.
- Take the wooden skewers and cut them slightly longer than the straws, then slide them through.
- Make a small hole in each bottle cap's center and push them onto the skewer ends to create wheels.
- Get your balloon ready by inflating and deflating it several times to stretch it out.
- Take another straw and tape the balloon's neck around one end. Make sure it's completely airtight.
- If you're using a bottle, cut a small hole on top and put the straw with the attached balloon through it, pointing backward.
- Blow up the balloon through the straw, hold the air in, set your car on a smooth surface, and watch it go!
Science Behind the Balloon Car
The car shows Newton's Third Law of Motion in action - every action has an equal and opposite reaction. The air rushes out of the balloon one way and pushes the car forward in the opposite direction. Your inflated balloon stores energy that turns into motion when you let go.
The car goes faster and further when you fill the balloon with more air because it stores more energy. The car works best on smooth surfaces because rough surfaces create too much friction between the wheels and floor.
Best Age Group
Kids between 6-12 years old will love this project. Younger children (6-8) need adult help with cutting and putting pieces together. Older kids (9-12) can build it by themselves and try different designs. This makes a perfect weekend activity for Indian families that combines fun with learning about physics.
Build a Paper Bridge with Coins
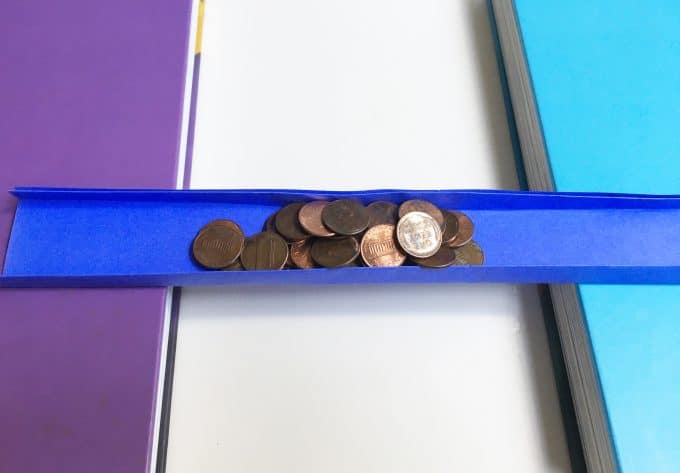
Image Source: Teach Beside Me
Let's explore structural engineering principles with a fascinating paper bridge experiment that tests strength and design skills. A simple sheet of paper can become surprisingly sturdy when you fold it the right way.
Paper Bridge Materials
- 2 thick books or boxes of equal height
- 1 sheet of writing or printer paper
- Coins (₹1, ₹2 or ₹5 coins work perfectly)
- Scissors (optional)
- Tape (optional)
Steps to Build the Bridge
- Set two books about 20 cm apart on a flat surface.
- Cut a paper rectangle roughly 30 cm × 10 cm. A standard sheet works fine.
- Place the paper flat across the books to create a simple bridge.
- Put one coin in the middle. Watch how the paper sags right away.
- Take off the coin and try different folding patterns:
- Make accordion-style folds lengthwise
- Fold the paper in half several times
- Make vertical "walls" by folding up the edges
- Test your bridge's strength by adding coins one by one. Count how many it holds before it falls.
- Keep improving your design to make it stronger without extra materials.
Science Behind the Paper Bridge
The paper's strength changes dramatically when you alter its shape. A flat paper sheet bends easily because it lacks support. Folding creates triangular sections that spread weight evenly across the structure.
Engineers apply this same idea to ground construction. The vertical "walls" you create by folding fight against bending forces, just like triangular supports strengthen actual bridges. Triangles have always been one of engineering's strongest shapes because they spread stress so well.
Best Age Group
Kids aged 6-12 years love this experiment. Younger children (6-8) can focus on basic folds and counting coins. Older kids (9-12) can tackle complex designs and grasp the engineering concepts. Indian families find this perfect for rainy days. It uses common items like textbooks and spare change to teach basic engineering ideas.
Make a Cloud in a Jar
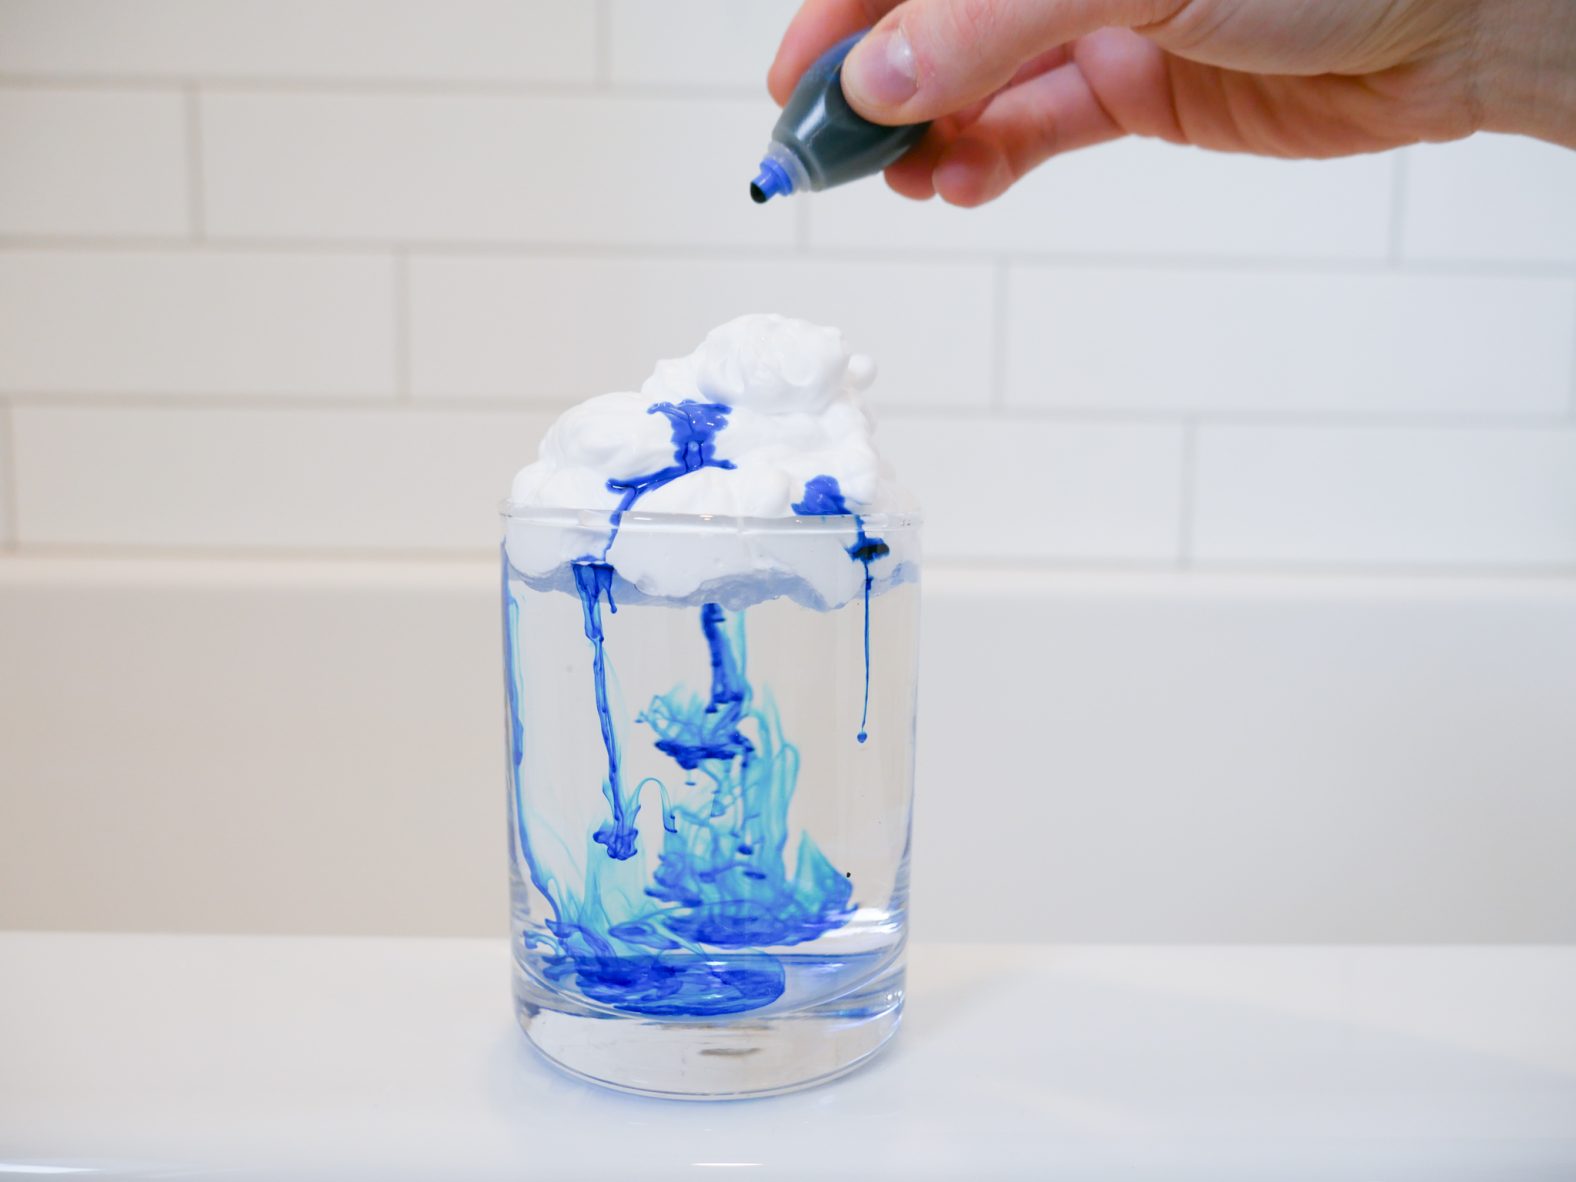
Image Source: YouTube
Let's create weather magic right on your kitchen table with this cloud in a jar experiment! Kids find clouds fascinating, and now they can see how these fluffy formations develop through this engaging science activity.
Cloud Jar Materials
- A clear glass jar with lid (any clean jar works)
- Hot water from the tap (not boiling)
- Ice cubes (3-4 pieces)
- Hairspray in an aerosol can
- Optional: small cutting board or pot holder
- Optional: black paper for background
Steps to Create the Cloud
- Fill your jar about 1/3 with hot tap water.
- The inside of the jar needs warming, so swirl the water around completely.
- Place the lid upside down on top of the jar.
- Put 3-4 ice cubes on the upside-down lid.
- Wait about 20 seconds.
- Remove the lid quickly, spray a short burst of hairspray into the jar, and put the lid back with ice immediately.
- Your cloud will form inside the jar within 1-2 minutes.
- The cloud will escape when you remove the lid - watch closely.
Science Behind the Cloud Jar
This experiment shows exactly how clouds form in nature. Water vapor forms when the hot water evaporates. The warm, moist air rises to meet the cold air from the ice cubes at the jar's top. Tiny hairspray particles act as cloud condensation nuclei (CCN), and water vapor cools and condenses on them.
Natural particles like dust, pollen, sea spray, or volcanic ash serve this purpose outdoors. Hairspray particles attract water molecules because they are hygroscopic. This attraction allows water vapor to condense and create visible water droplets - your very own cloud!
Best Age Group
Children aged 5-12 years respond well to this experiment. Younger kids between 5-7 years marvel at the cloud's formation and escape. This activity is a great way to get them started with simple weather concepts. Older children (8-12) grasp the scientific principles of evaporation, condensation, and water cycle phases better.
Indian families can make this activity extra special during monsoon season. Kitchen items that are accessible to more people help connect everyday weather patterns with hands-on learning.
Color Changing Tea Experiment

Image Source: Fizzics Education
Create magical color-changing chemistry in your kitchen with this fascinating tea experiment! Kids love watching colors transform, and this pH indicator activity combines learning with pure amazement.
Tea Experiment Materials
- Butterfly pea flower tea (you can find it in Indian health stores or online)
- Lemon (half will do)
- Baking soda (works as an alternative to ammonia)
- 3 clear glasses or test tubes
- Hot water (not boiling)
- Stirring rod or spoon
- Dropper (a medicine dropper works great)
- Teaspoon
Steps to Do the Tea Experiment
- Make the butterfly pea flower tea following package instructions and let it cool to room temperature.
- Add about 20 ml of the blue tea into each of your three glasses.
- Take half a lemon and squeeze its juice into a small container.
- Take your dropper and add 3-4 drops of lemon juice to the first glass.
- Put a teaspoon of baking soda in the second glass.
- Keep the third glass as is - this will be your control.
- Stir each mixture gently and watch the colors magically change.
Science Behind the Color Change
The magic comes from special molecules called anthocyanins in butterfly pea flowers. These natural compounds work as pH indicators and change their color based on how acidic their environment becomes.
The tea shows a bright blue color in its natural slightly basic state. When you add lemon juice with its citric acid, the pH drops, and the anthocyanins start absorbing different light wavelengths. The color shifts from blue to purple and turns pink as you add more acid.
Adding baking soda makes the solution more basic, which pushes the color toward green. These color changes happen right away, making this reaction exciting to watch.
Best Age Group
This experiment works great with kids between 7-14 years. Younger children (7-10) will enjoy the visual magic and simple acid-base concepts. Older kids (11-14) can learn more about pH indicators and molecular changes.
Indian families will appreciate how this experiment connects their traditional knowledge of natural dyes with modern chemistry. The materials are easy to find in most Indian kitchens, making it a perfect activity for rainy days that blends visual excitement with hands-on science learning.
Make a DIY Sundial

Image Source: YouTube
Let's travel back in time with this ancient time-telling device. Kids can learn about Earth's rotation and the sun's movement across the sky. This DIY sundial project brings together history and astronomy in one simple activity.
Sundial Materials
- Paper plate (or a circle cut from cardboard)
- Pencil or straight straw
- Scissors or nail (for making a hole)
- Markers or crayons
- Optional: Small stones for outdoor sundials
Steps to Make a Sundial
- Paint or decorate the back of your paper plate if desired.
- Cut out the clock face template or draw numbers 1-12 around the edge of your plate like a clock.
- Make a small hole in the center of the plate using scissors or a nail.
- Push the pencil through the hole—it should stand perpendicular to the plate.
- Take your sundial outside to a sunny spot.
- Position your sundial with the number 12 pointing north (use a compass app if available).
- The shadow cast by the pencil moves clockwise as the day progresses.
- Mark each hour's shadow position if creating a permanent sundial.
Science Behind the Sundial
Earth's rotation on its axis makes sundials work. Our planet's rotation makes the sun appear to move across the sky. This movement causes the shadow cast by the gnomon (the upright pencil) to shift position throughout the day.
The shadow moves clockwise in the Northern Hemisphere, much like the hands of an analog clock. Sundials represent the oldest known method of telling time. Ancient Egyptians first used them around 3500 BC.
Best Age Group
Children aged 5-12 years will enjoy this project. The younger ones (5-7) love the crafting part and simple time-telling. Older children (8-12) can learn the astronomical concepts and make precise measurements.
Indian families will find this an excellent daytime activity that connects traditional time measurement with modern learning. Time-tracking methods like these were used by many ancient civilizations, including India.
Create a Capillary Action Rainbow
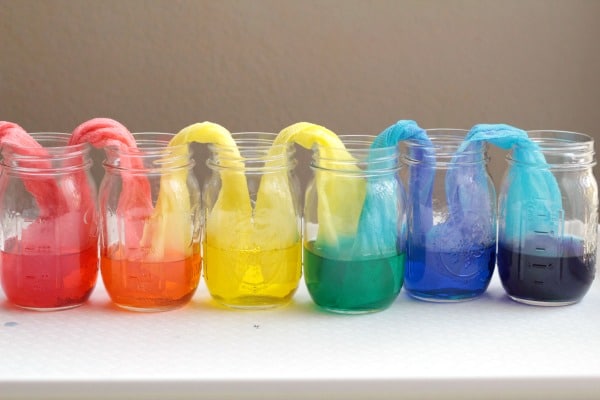
Image Source: Small Step for STEM
Let's watch water climb up against gravity in this magical rainbow experiment! Your kids will be amazed when they see colored water "walk" between cups. The result is a stunning rainbow display that shows how plants drink water.
Capillary Rainbow Materials
- 6-7 clear plastic cups or glasses of similar size
- Paper towels (half sheets work best)
- Food coloring (red, yellow, and blue)
- Water
- Optional: recording sheet to track observations
- Stirring stick or spoon
Steps to Create the Rainbow
- Put 6-7 cups in a row on a flat surface.
- Pour water into every other cup (cups 1, 3, 5, and 7 if using 7 cups) until they're about 3/4 full.
- Add 5 drops of red food coloring to cups 1 and 7, yellow to cup 3, and blue to cup 5. Stir each cup well.
- Take each paper towel and fold it lengthwise several times to make a strip about 1 inch wide.
- Cut the paper towels a bit shorter to avoid extra length above the cups.
- Make "bridges" by putting one end of each folded paper towel in a cup with colored water and the other end in an empty cup.
- Now comes the fun part - watch! The colored water starts climbing up the paper towels within minutes.
- Give it a few hours and you'll see the empty cups fill with mixed colors that create orange, green, and purple.
Science Behind Capillary Action
This cool process shows capillary action - knowing how to make liquid flow upward against gravity through tiny spaces. Paper towels have small fibers made of cellulose that create tiny gaps. These gaps work just like capillary tubes.
Three forces make this happen:
- Cohesion: Water molecules stick to other water molecules
- Adhesion: Water molecules' attention is drawn to the paper towel fibers
- Surface tension: Creates a "skin" on water's surface that helps it move together
Plants use this same process to pull water from their roots up to their leaves!
Best Age Group
Kids aged 4-10 years love this experiment. The little ones enjoy watching the colors change like magic, while older kids learn about the science behind it and how plants grow. This makes a perfect rainy day activity across India since you can find all the materials in your kitchen.
Make a Coin Spinner

Image Source: YouTube
A fascinating physics demonstration shows how everyday coins can become mesmerizing spinning tops. This project needs minimal setup and shows the principles of rotational motion in action.
Coin Spinner Materials
- Cardboard (cereal box or thick card stock)
- Paper (white or colored)
- Scissors
- Glue
- A coin (₹1, ₹2, or ₹5 coins work perfectly)
- Bowl or cup (about 5-6 inches in diameter)
- Markers or crayons to decorate
Steps to Make the Spinner
- Use your bowl as a template to trace a circle on the cardboard.
- Cut the cardboard circle with care.
- Make another circle on colored paper using the same bowl and cut it out.
- Let your creativity flow by adding patterns to the paper circle. Bright colors and geometric shapes look amazing. The primary colors blend beautifully once the spinner moves.
- Attach the decorated paper to one or both sides of your cardboard circle with glue.
- Create a small slit at the circle's center. The slit should be a bit smaller than your coin's width.
- Push the coin through until it fits tight. Your coin should stand straight up from the cardboard.
- You can also use a dab of glue or tape to secure the coin underneath.
Science Behind the Spinner
The spinner's magic comes from basic physics. The spinning motion creates gyroscopic stability - the same principle that keeps bikes balanced while moving. The centrifugal force helps maintain the spinner's balance.
Air resistance and friction slow the coin down. The coin starts to vibrate about 100 times per second right before it stops. This creates that distinctive whirling sound you hear getting higher in pitch.
The spinner's patterns reveal something amazing too. Colors seem to mix together as the disk spins. A red and blue pattern creates what looks like purple.
Best Age Group
Kids between 5-10 years old love this experiment. The younger ones (5-7) enjoy watching the colors and making their designs, whatever they understand about the physics. Older kids (8-10) start to learn the simple concepts of motion, friction, and gyroscopic stability.
Indian families find this project perfect for after-school activities since all materials are easy to find at home. The project brings together artistic expression and scientific learning in a fun way that keeps children engaged.
Build a Tower with Spaghetti and Marshmallows

Image Source: Mad About Science
Your child can become a young architect with this exciting structural engineering challenge. Building a spaghetti tower helps test creativity and scientific thinking. Kids learn about stability and weight distribution through hands-on construction.
Tower Materials
- 20 sticks of uncooked spaghetti
- Small marshmallows (15-20) or one large marshmallow
- Optional: 1 yard of string
- Optional: 1 yard of tape
- Measuring device (ruler or tape measure)
- Clean workspace
Steps to Build the Tower
- Push a piece of spaghetti deep into a marshmallow to begin.
- Add more spaghetti sticks and connect them with marshmallows to create your structure.
- Build triangular shapes because they give amazing strength.
- Your tower's base should be wider than its top for better stability.
- Check your structure by carefully placing objects on top.
- Try different designs to find which one holds the most weight.
Science Behind the Tower
Engineers use science and math to design structures that stay strong without breaking. The spaghetti tower shows us how real buildings work.
Each spaghetti piece helps carry the weight throughout the tower. Triangles make the structure extra strong because they spread out the pressure evenly. That's why towers built with triangular supports can hold more weight.
Gravity pulls everything down, so successful towers need a wide base and narrow top. This explains why big structures like electricity pylons and the Eiffel Tower have this shape.
Best Age Group
Kids between 4-10 years enjoy this experiment the most. Little ones (4-6) love the creative building part and feel proud when their tower stands. Older kids (7-10) learn engineering ideas and love testing different designs.
Indian families can turn this into a perfect weekend activity using simple kitchen items. Kids develop problem-solving skills and learn physics basics while having fun building their towers.
Make a Simple Circuit with Foil

Image Source: YouTube
Light up the amazing world of electricity with this simple foil circuit. Your ordinary kitchen aluminum can create conducting pathways for electric current.
Circuit Materials
- 1 small LED light bulb or holiday light
- Aluminum foil strips (¼ inch wide)
- 3V button battery (or AA battery)
- Clear tape
- Scissors
- Paper template (optional)
- Items to test conductivity: paper clips, buttons
Steps to Make the Circuit
- Cut several aluminum foil strips about ¼-inch wide and a few inches long. These strips will work as your wires.
- You can glue foil strips onto the paper template to create a circuit path. Without a template, arrange strips on a flat surface and make sure they touch end-to-end.
- The ends of each foil strip need careful bending to ensure good contact between pieces.
- Put your battery on one end of the foil path. Both sides of the battery should directly touch the foil.
- Connect your LED light by touching one wire to the foil on the battery's positive side and the other wire to the foil on the negative side.
- Your bulb should light up once all connections are secure. This shows you have a complete circuit!
Science Behind the Circuit
Electrons flow along a closed path in a circuit to provide power. This simple setup allows electrons to move from the battery (power source), through the aluminum foil (conductor), into the light bulb (load), and back to the battery.
Aluminum foil works as an excellent conductor because it contains free electrons that move easily through its structure, like all metals. The circuit must form a complete loop without gaps to light the bulb. The light won't work if there's a break anywhere because electrons cannot flow.
Best Age Group
Children aged 5-12 years will enjoy this experiment the most. Kids between 5-7 years need supervision while cutting foil and handling small parts. Older kids from 8-12 years can learn more complex ideas like conductivity testing.
This project makes a perfect after-school activity across India using common kitchen items. Kids learn simple electrical principles and develop problem-solving skills as they figure out why their circuits might not work at first.
Create a Water Xylophone
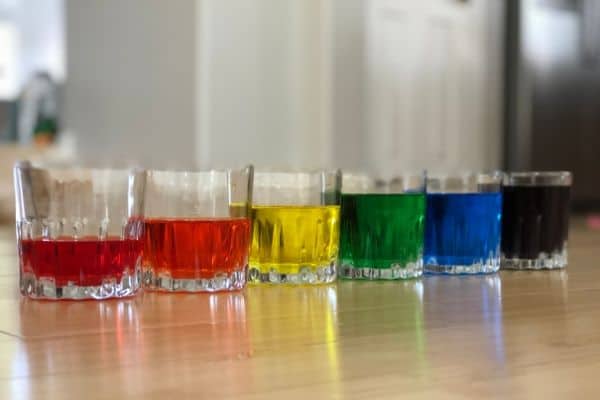
Image Source: YouTube
This delightful sound science experiment transforms regular glasses into a musical instrument. Children learn about vibration and pitch as they create beautiful music right in your kitchen.
Xylophone Materials
- 4-6 similar glass jars or drinking glasses (glass works better than plastic)
- Water
- Food coloring (creates visual appeal, but optional)
- Measuring cups (1 cup, ½ cup, ¼ cup)
- Wooden sticks, spoons, or chopsticks to strike
- Optional: tuning app to match specific notes
Steps to Make the Xylophone
- The empty glasses should be lined up and tapped with your wooden stick to hear their similar sounds.
- Water should fill about ¾ of the first glass.
- Each following glass needs less water to create a stepwise pattern.
- These measurements work well: 1¾ cups, 1½ cups, 1¼ cups, 1 cup, ¾ cup, and ½ cup.
- A few drops of food coloring in each glass help visualize the different water levels.
- The glasses should be arranged from most to least full.
- Each glass produces different tones when tapped with the stick.
- The water levels can be adjusted to create your desired notes.
Science Behind the Sound
Empty glasses produce a consistent sound when tapped. The pitch changes as water is added. This occurs because vibrations travel through both the glass and water inside. More water in the glass creates a lower pitch since the greater liquid mass slows down the vibrations. Lower frequency sounds come from fewer vibrations per second.
Glasses containing less water allow faster vibrations and create higher-pitched sounds. Children observe how sound waves move differently through varying amounts of liquid. This principle explains how musical instruments produce different notes.
Best Age Group
Children aged 4-10 years benefit most from this water xylophone experiment. The colorful visual aspects and sound creation appeal to younger kids (4-6) as they learn simple concepts of high and low pitches. Older children (7-10) grasp the scientific principles of vibration and frequency. They can even try playing simple tunes like "Mary Had a Little Lamb".
Make a DIY Thermometer

Image Source: YouTube
Learn how commercial thermometers work by creating your own at home. This hands-on project teaches children about thermal expansion through a functional measuring tool they build themselves.
Thermometer Materials
- Clear plastic bottle with narrow neck
- Clear drinking straw
- Rubbing alcohol (isopropyl alcohol)
- Water
- Red food coloring
- Modeling clay or playdough
- Permanent marker
- Optional: standard thermometer to adjust measurements
Steps to Make the Thermometer
- Pour rubbing alcohol into the bottle until it reaches between one-third and halfway full.
- Mix several drops of red food coloring with the liquid until the color blends evenly.
- Take a ball of modeling clay and flatten it. Make a hole through its center just big enough to fit the straw.
- Push the straw through the clay and place it so the bottom sits in the liquid without touching the base.
- Press the clay around the bottle's neck. This creates a tight seal but leaves the straw open.
- Add colored alcohol drops into the straw until the liquid rises about one-third up the exposed part.
- The thermometer needs adjustment. Place the bottle in ice water for 5 minutes and mark the liquid level.
- Move it to warm water and mark that new level.
Science Behind the Thermometer
Thermal expansion powers this experiment. Liquids expand substantially more than solids with heat and shrink as they cool. The alcohol climbs up the straw as temperatures rise and drops when temperatures fall.
This same principle led Daniel Fahrenheit to create his first thermometer in 1714, though he used mercury instead of alcohol. The straw's narrow design helps us see small volume changes that show temperature differences.
Best Age Group
Children between 8-12 years benefit most from this science activity. Adult supervision becomes essential for younger children because of the rubbing alcohol. Indian households will find this project particularly useful since most materials are accessible, helping connect everyday tools with practical science lessons.
Create a Rain Gage
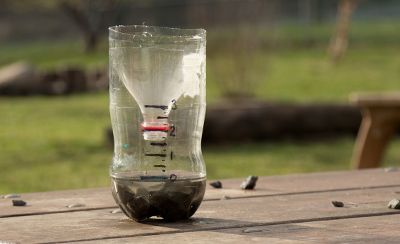
Image Source: YouTube
Let's turn you into a backyard meteorologist! Build your own rain gage and track rainfall patterns. This simple weather tool will help kids learn about measuring precipitation and develop their observation skills.
Rain Gage Materials
- A tall, clear jar with straight sides (spaghetti sauce jars work perfectly)
- Plastic funnel (opening roughly the same size as jar base)
- Clear or masking tape
- Permanent marker
- Plastic ruler
- Optional: Small pebbles to keep it stable
- Optional: Food coloring so you can see better
Steps to Make the Rain Gage
Start by cleaning your jar and taking off any labels. Put a vertical strip of tape along the jar's outside from bottom to top. Take your ruler and mark centimeters or half-inch increments on the tape, starting at the bottom. Cover these measurements with another layer of clear tape to protect them from water. Put the funnel in the jar's opening—this catches rain without splashing. Pick a flat, open spot away from trees or buildings where nothing blocks the rainfall.
Science Behind the Rain Gage
The science is pretty simple—rain gages collect and measure precipitation over a specific area. Weather experts use similar tools to gather rainfall data, usually measuring in millimeters of height (which equals liters per square meter). Water drops through the funnel into your container and builds up, letting you read the depth from your markings. Getting accurate measurements depends on proper placement because wind, evaporation, and splash can affect your readings.
Best Age Group
Kids between 6-12 years old really enjoy this weather project. The younger ones (6-8) love checking the gage and writing down simple measurements. Older kids (8-12) can grasp weather patterns and make graphs to track rainfall over time. This activity connects science to ground weather monitoring across India, which becomes extra meaningful during monsoon season when rainfall matters to everyone's daily life.
Make a Static Electricity Butterfly
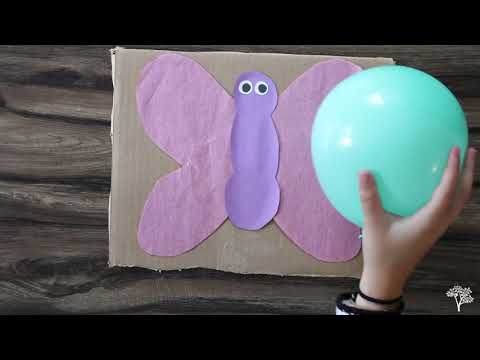
Image Source: YouTube
Make use of static electricity's invisible power with this magical butterfly experiment. Paper wings come alive without any touch! This fascinating physics demonstration teaches children about electrical charges through hands-on fun.
Butterfly Materials
- Cardboard square (approximately 7×7 inches)
- Lightweight tissue paper
- Cardstock paper
- Glue stick
- Scissors
- Googly eyes (optional)
- Balloon
- Pencil and marker
Steps to Make the Butterfly
- Cut a square from cardboard to create your base.
- Draw butterfly wings on tissue paper with a pencil. Make sure they're smaller than your cardboard square.
- Cut out the tissue paper wings and place them on the cardboard—don't glue them down!
- Cut a butterfly body from cardstock and glue it down the middle. Let it overlap onto the cardboard.
- Add googly eyes and draw antennae if you want.
- Blow up your balloon and tie it.
- Rub the balloon on your hair or wool cloth vigorously for about 20 seconds.
- Hold the charged balloon above the butterfly's wings without touching them.
- The wings rise toward the balloon magically as you move it closer and drop when you pull away.
Science Behind Static Electricity
Objects usually have equal numbers of protons (positive charge) and electrons (negative charge), which makes them neutral. The magic happens when electrons move from your hair to the balloon during rubbing. This gives the balloon a negative charge. The negatively charged balloon pulls the positively charged tissue paper toward it because opposite charges attract each other. Light tissue paper wings lift toward the balloon because this attraction is strong enough.
Best Age Group
Children aged 5-12 years enjoy this experiment the most. Young kids (kindergarten to 4th grade) love the "magical" wing movement, whatever their understanding of physics. Older children learn simple electricity concepts like electron transfer. Indian families find this a perfect weekend activity. It uses simple household materials and connects fun with basic physics education.
Build a Water Filter with Kitchen Items

Image Source: Generation Genius
Let's discover how water gets clean with this amazing filter project! Your child will see firsthand how simple materials can remove dirt and impurities, just like nature does every day.
Water Filter Materials
- Clear plastic bottle (1-2 liter soda bottle)
- Cotton balls or coffee filter
- Fine sand (available in most Indian households)
- Coarse sand or small pebbles
- Activated charcoal (from health stores or crushed BBQ charcoal)
- Scissors or knife (adult supervision required)
- Rubber band
- Muddy water to test
- Collection container (glass or another bottle)
Steps to Build the Filter
- Use scissors to cut the bottom off your plastic bottle.
- Turn the bottle upside-down without its cap and place it in your collection container.
- Put cotton balls or a coffee filter at the bottom (now top) of the inverted bottle.
- Add a 2-3 inch layer of crushed charcoal above the cotton.
- Add a layer of fine sand over the charcoal.
- Place a layer of coarse sand or small pebbles next.
- Top it with another thin layer of fine sand.
- Slowly pour muddy water into your filter and watch the magic happen.
Science Behind the Filter
Your filter cleans water through multiple stages, and each material catches different types of dirt. The gravel layer traps bigger particles while sand layers catch smaller ones. The charcoal's role is vital - it uses an electrical charge to grab tiny particles you can't even see.
Big water treatment plants use similar steps: aeration, coagulation, sedimentation, and filtration. Nature's filtration takes much longer but cleans better. The filtered water might look clear, but it still has invisible bacteria, so don't drink it without more treatment.
Best Age Group
Kids between 8-12 years love this experiment. Younger ones can join in with adult help, while older children learn about the science behind it. This activity starts great conversations about water conservation across India, especially during monsoon season when clean water becomes a concern. The best part? You'll find most materials right in your kitchen, making it perfect to try on weekends.
Comparison Table
| Experiment Name | Main Kitchen Materials | Time Required | Suitable Age Range | Key Scientific Concept | Difficulty Level |
|---|---|---|---|---|---|
| Rubber Egg | Vinegar, Raw Egg | 48-72 hours | 5-10 years | Chemical Reaction | Easy |
| Balloon Car | Plastic Bottle, Wooden Skewers | Not mentioned | 6-12 years | Newton's Third Law | Medium |
| Paper Bridge | Paper, Coins | 15-30 minutes | 6-12 years | Structural Engineering | Easy |
| Cloud in a Jar | Glass Jar, Hot Water, Ice | 2-3 minutes | 5-12 years | Water Vapor Condensation | Easy |
| Color Changing Tea | Butterfly Pea Flower Tea, Lemon | 10-15 minutes | 7-14 years | pH Indicators | Easy |
| DIY Sundial | Paper Plate, Pencil | Not mentioned | 5-12 years | Earth's Rotation | Easy |
| Capillary Rainbow | Paper Towels, Food Coloring | Several hours | 4-10 years | Capillary Action | Easy |
| Coin Spinner | Cardboard, Coins | Not mentioned | 5-10 years | Gyroscopic Stability | Medium |
| Spaghetti Tower | Spaghetti, Marshmallows | Not mentioned | 4-10 years | Structural Stability | Medium |
| Simple Circuit | Aluminum Foil | Not mentioned | 5-12 years | Electrical Conductivity | Medium |
| Water Xylophone | Glass Jars, Water | 15-20 minutes | 4-10 years | Sound Vibration | Easy |
| DIY Thermometer | Clear Bottle, Rubbing Alcohol | Not mentioned | 8-12 years | Thermal Expansion | Medium |
| Rain Gage | Clear Jar, Funnel | Ongoing | 6-12 years | Precipitation Measurement | Easy |
| Static Butterfly | Tissue Paper, Balloon | 10-15 minutes | 5-12 years | Static Electricity | Easy |
| Water Filter | Plastic Bottle, Sand, Charcoal | 30-45 minutes | 8-12 years | Water Purification | Medium |
Conclusion
Science becomes magical when children experience it through hands-on experiments. These 15 easy science projects show how regular kitchen items can become extraordinary learning tools at home. Most Indian households already have everything needed - from common spices that work as pH indicators to everyday items like aluminum foil that teach electrical conductivity.
Kids learn best through play, so these experiments make scientific concepts real instead of abstract. Your child might not remember textbook definitions of capillary action, but they'll never forget watching colored water climb against gravity in the rainbow experiment.
Parents often worry about creating learning experiences that match school curricula. These kitchen science activities address this challenge by reinforcing basic STEM concepts while building critical thinking skills. The experiments work well for children of all ages, which lets siblings learn together.
These projects shine in their simplicity. Some experiments like the rubber egg need 48 hours of patience, while others like the cloud in a jar create instant results that fascinate young minds. On top of that, many experiments are practically free, using materials you already have in most Indian kitchens.
Science experiments strengthen family bonds naturally. You create lasting memories while helping your child build a balloon car or measure rainfall during monsoon season. These activities serve two purposes - they promote learning and create quality family time.
Start with one simple experiment this weekend. The static electricity butterfly works great in dry weather, or try the rain gage during monsoon season. Your family might soon look forward to weekly "kitchen science days" as a tradition. The excitement on your child's eyes when their experiment succeeds will be nowhere near the minimal prep work needed.
Today's playful exploration could get you started in thinking about scientific discovery for tomorrow. Many great scientists began their experience with simple curiosity about how things work - exactly what these kitchen experiments foster.